


How does she do that?!
Besides riding a wheelie down the street, I have always thought that the track stand (balancing a bike in one spot) was the coolest trick a sane person could accomplish. By sane person I mean someone who is never purposely going to attempt to pull off a no handed back flip, wearing only loosefit Levi's and a skateboard skid-lid. The track stand is simple, elegant, and incredibly useful to every type of cyclist. Road or mountain, the track stand will make you a better rider, not to mention impress the heck out of your friends! Let me help you learn. You won't be sorry!
The term "track stand" comes from track racing. Although these days it seems the velodrome racers have assistants hold their seats for them, BMXers still carry on the tradition. Racers from all disciplines still find the track stand useful on occasion. Even if you don't race, it is very handy at stoplights! The kids in the cars next to you dig it, and certainly not having to fumble around clipping in when the light turns green is to everyone's advantage.
For you mountain bikers, the ability to track stand allows you to scope a line before you commit to a nasty section, or to pause for a creature crossing the trail, and you will not believe how you will flow with catlike balance through tight switchbacks with new found ease. Now you are convinced, yes?
I was convinced the first time I saw a roadie at a major intersection balance, virtually motionless, for what had to be three or four minutes while the lights went through their endless cycle. On that day, I decided I needed to be able to do that; a year later, I had it! Now don't be discouraged, it took me a year because I taught myself. I had no one to tell me what I was doing wrong, or to offer shortcuts, but I did have a husband who didn't mind if I practiced in the living room! I offer the following advice so you can learn faster and more gracefully than I did.
FIRST THINGS FIRST!
Do not clip in! If you ride with flat pedals, great! You are one step ahead. If you ride with toe clips and straps just remove the straps so you can evacuate your foot with maximum velocity. If you ride with clipless pedals, just wear regular tennies when you practice track standing, or you can swap them for flats if you are not lazy like me. The advantage of swapping for flat pedals is the comfort factor, since many of today's clipless pedals are so minimal. In tennies, it is kind of like standing on rocks. If you are comfortable, you will play longer! Most pedals come on and off with a 15mm open-end wrench, or an official pedal wrench from your friendly neighborhood shop for about 20 bucks. Just remember that the left pedal threads backwards!
READY TO RIDE?
Virtually motionless. The key word here is not "motionless", but "virtually." Even the best trackstanders in the world are never entirely motionless. I learned this the hard way. When I was first teaching myself, I would grab big handfuls of brake in an attempt to keep the bike still underneath me. This resulted in much falling over and swearing, thus disturbing my husband's Television enjoyment. So I will now suggest to you that you take your bike outside and ride in circles. Circles you say? How is a circle like a track stand? You will see.
But first, let's find your "chocolate foot." Hans Rey calls the foot that you naturally put forward when you are out of the saddle, your "chocolate foot." You will have to ask him why. I use the term because I like the way he says "chocolate." Anyway, if you don't already know which foot likes to be in front, stand up and sprint for a moment, then while still out of the saddle, stop pedaling and coast. Look down. The foot that is forward is your chocolate foot. Still not sure? Find a nice stretch of linoleum, take off your shoes, run and slide in your socks like a kid across the floor. Look down. Once again, the foot in front is your chocolate foot. It is important for you to know because having your chocolate foot forward while you learn to track stand will make life easier.
Ride in circles Still, what about circles? OK, keeping in mind your chocolate foot, ride a circle as small as you can, turning your bike in the direction of that foot. My chocolate foot is my left, so I would circle to the left. Use your brakes very lightly, let the pads drag on the rims to control speed, and choose a gear in the middle to lower range so you don't get rolling too fast in the first place. The slower you go, the tighter a circle you can make, but the key to tight circles is looking where you want to go! Your bike will follow your head. Try to look at your back tire and feel what happens!
Once you feel comfortable making tight circles, try to make the same size circle by ratcheting, if you are not doing so already. Ratcheting is exactly what it sounds like; it is propelling your bike forward by only making a partial pedal stroke. Try it by going straight first. Stand on the pedals with your chocolate foot forward, push that pedal down about 20 degrees, now allow it to come back to level and repeat. You are now ratcheting! Next, make your tight circles using this same technique. Practice this until you can do it so slowly, you are almost not moving at all! What this exercise does is put your body in the proper position to balance on two wheels.
If you can, watch someone track stand and note his or her body position. They are most likely standing, they have one foot forward, and their front wheel is turned slightly in the direction of the forward foot. Looks a whole bunch like that silly circle eh? Yeah, but they aren't moving! Actually, they are, they are rolling forward and back, ever so slightly. You've got the forward part, now it's time to roll back!
Yikes! Backwards!?! Yeah, just a little. Now you will have to hunt around for just the right spot. What you are looking for is a very slight uphill, preferably dirt or grass that has an immobile object that you can push your front wheel against. A park bench or log about hub high is ideal. It should be an object you can see over.
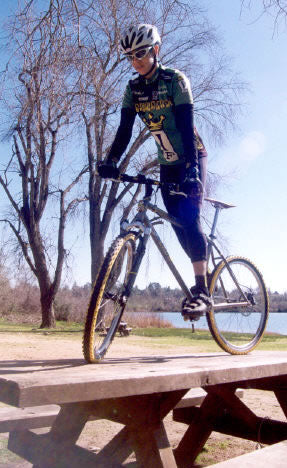
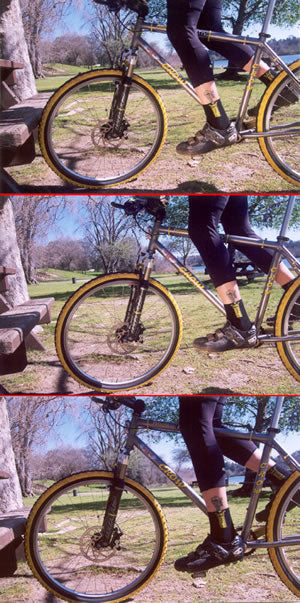
Begin by assuming your track stand position with your front wheel perpendicular against the bench, while the rest of your bike is at an angle just like you are making a tight turn with your chocolate foot forward. Put your weight on your chocolate foot so you can get your back foot on the other pedal. You should be standing with your shoulders just about over the front hub, which will allow the bike to easily move back and forth underneath you. See the photos to figure out what the heck I am talking about. The object is to use the bench to do an assisted track stand. You should be able to create a stable platform by applying pressure to your chocolate foot with your front tire firmly against the bench. Keep practicing until you are comfortable with the "assisted" track stand.
Once you can stand comfortably against the bench, assume the same position, but with your chocolate foot at 8 o'clock instead of 9 o'clock. Now, take some of the pressure off of your chocolate foot and allow the bike to roll back just enough so your feet return to horizontal (this is what the slight incline is for) No Brakes! Your front tire should now be a couple of inches away from the bench -- Spooky!
If you haven't panicked and bailed yet, and you may the first few tries, gently increase the pressure with your chocolate foot again and roll your tire back up to the bench to regain your sanity. Do this over and over again until it is easy. Try not to stare at your front tire. You will have better balance if you look towards the horizon. You are almost there! The better you get at the bench trick, the less you will actually need the bench. Try rolling back and fourth without actually touching it. Very cool! Now loose the bench.
GOT SKILLS?
Yeah, you got 'em. Find yourself a nice patch of dirt or grass once again with a slight incline and assume "the position" with your front wheel facing uphill. You will probably find that it is easier to roll into track stand than it is to do it from a dead stop. Now just like the bench exercise, roll your bike back and forth underneath you. You are now track standing. Hooray! The better you get, the less perceptible the rockin' and rollin' becomes.
Have you tried your new skill on the pavement yet? Much harder, huh? The reasoning behind the grass and the incline has to do with resistance, not just that it hurts less to fall on. It helps to slow everything down. As I mentioned before, I tried to learn to track stand using my brakes, brakes are for stopping. The track stand is a fluid, dynamic feat full of minute motion and constant readjustment. It was not until I let go of the brake levers that I truly learned what the track stand was all about. By allowing the terrain to be the resistance, you will learn much more efficiently. Then the pavement will hone your skills to perfection, without brakes.
Once you can track stand on an incline, try it on flat ground. On flat ground you will have to learn to shift your weight fore and aft to get the ever-so-slight rolling to keep your balance, but by now you should have a pretty good feel for it. You will notice that this motion will come from the shoulders and hips. See? They ARE good for something besides attracting fat!
READY TO CLIP IN?
Once you feel more or less comfortable with your ability, try it clipped in. It is a little scary, and you will fall down at least once. It may be the first time you try, or it could be years later (I fell down in a bike shop in front of all my friends when my cleat came loose and refused to release). Just keep that in mind and accept it. It is still worth the trouble.
Before you take your new trick into traffic, I urge you to practice looking around while track standing. This is hard. Remember that your bike follows your head, so to track stand and look around means training your body to ignore instinct. Start with a normal track stand, looking out ahead of you and find the sweet spot. The sweet spot is that zone where balance is achieved with minimal rolling. You will know. Once you are comfortable, try looking left or right. You will loose the sweet spot almost instantly. Keep trying, you'll get it, and please don't try track standing in traffic until you can do this comfortably.
Now that you are a track stand studette, here are some tricks you can learn to keep the fun rolling. Try the seated track stand. Believe me, this is not easy since your hips are now glued to your saddle. Go from a standing to a seated track stand and back again. No problemo? Try the no-handed track stand! Very Hot! OK, now close your eyes. Try a mirror image, that is, try it with your other foot forward and your wheel turned the opposite direction. Try it downhill. Have contests with your friends, and practice every chance you get. I know you will be amazed at how the ability to track stand will improve every aspect of your riding. It elevated my riding to the next level. It will do the same for you, and guys eat it up!
Next month, I will be attending a clinic presented by Team Luna rider, Marla Streb. I know she will have much to teach me, and I can't wait to share her knowledge with you.